Tech

New Products

Random Thoughts

Nostalgia

Tag Toppers Available For Your Business, Car Club Or Event...

Posted on 6/1/18 with No comments

I have been collecting license plate tag toppers for close to forty years, and have more than 200 different Tag Toppers in my collection. If you have read my other entry on Tag Toppers you know that I have reproduced some of the original design Tag Toppers with the Fifth Avenue logo for use on the Great Race cars. I also offer them to customers who what an original design auto advertising accessory to display on their antique vehicle. My current 2018 design features a reflectorized background, so it shows up at night.

Meanwhile...Here are a few of my originals....


Example of an early Tag Topper from the late 1940's.


This One Has Some Well Detailed Graphics...


Tag Toppers Came In All Shapes And Sizes...


This One Has Lots Of Detail And Is Porcelain... A Keeper.
                    

Example Of An Early "Downer" Tag Topper


This one was designed to go behind the chrome bezel of the trunk handle.

Tag Toppers are still a very effective way to advertise as I found out in 1993 when the car I sponsored in the Great Race won the Great Race Sportsman class and the driver Howard Sharp earned a 10 minute interview on national television.


    My first Tag Topper Design That Ended up on ESPN TV.

Howard Sharp the car owner did a sit down interview in front of his car with an ESPN reporter, and my tag topper was proudly on display attached to the front license plate bracket of his 1929 Dodge Sport Roadster, with my business name and phone number proudly on display! I got free advertising on national TV for ten minutes, and all I had invested was the cost of that tag topper. As I was watching I was thinking to my self... that tag topper was a dang good investment!


Howard now enters this 1915 Hudson in the Great Race with is son Douglas. Howard went on to win the Great Race twice more, in 2011 and again in 2015. I have sponsored Howard in the Great Race every year for more than 25 years and we have become good friends.


The Willys Overland Jeepster Club designed these and each of their 400 members in good standing got one in honor of the clubs 50th anniversary.

I often get asked if I can make custom Tag Toppers for car clubs, other businesses, and special events. The answer is yes, and have been making them off and on for about ten years but have not formally offered the service. But I am getting enough requests that I decided to explain the process and outline the options so if you want to have some made you will have some idea what is involved.

First up is the blanks. They are made of 20 thousandths thick aluminum (same thickness as an interstate road sign) so they are very durable and they will not rust.

As for the colors... you can use most any combination of up to five different ink colors, in addition to any background color so you could end up with six different colors  on a Tag Topper.  My current Tag Topper has 4 colors, Green, White, Red, Black, and the background color of yellow for a total of five colors.

Along with the colors you can screen the background to lighten a color to highlight a detail. The light green color in the background of my logo, is the same dark green color behind my telephone number. It has simple been screen down to thirty percent to give my logo some depth.  The black is also screened for the grill and front bumper.

Reverse type is also available, which is what I have done on the Fifth Avenue Tag Topper to draw attention to the telephone number.

Bleed to the edge... simply means that the background color can be printed out to the very edge of the Tag Topper and a non print boarder area is not necessary.


An example of reverse lettering on an early Tag Topper


Some Tag Toppers Were Even Embossed...

We can add most any logo or graphic along with most any lettering style. A lesson from the billboard company... simple is good and if you select a light colored background such as yellow or white, you should select a dark color of ink such as a black, dark brown, red or dark green. The better the contrast the more eye catching it will be.

We also offer a reflectorized background just like a modern road sign so your tag topper will show up at night. The Fifth Avenue Tag Topper examples shown at the top of the page are reflectorized.

Think about road signs, a stop sign for example, red background, white lettering. the colors catch your eyes and the message is easy to read from a distance. And once you have seen it you immediately recognize it again.


This is an example of a well designed Tag Topper. Notice the bright contrasting colors, the simple message and the logo. This one is easy to read from a distance and it is very eye catching!

The billboard people say an average driver has just 7 seconds to read an entire billboard message at 60 mph. that is why most billboards have a short simple message and a graphic to catch your eye.

The advantage to a Tag Topper is that while it is smaller in size than a billboard it will likely be in front of the car following you for a lot longer than seven seconds. And because antique vehicles tend to travel slower than their modern counterparts, you pretty much have a captive audience.


Uppers and Downers...refers to the mounting of the Tag Topper, it can be mounted to the top of a license plate or license plate bracket such as the one on a gravel pan behind the front bumper or the tag topper can be designed to mount hanging down such as on the headlight bar of a Model A Ford.


I use Tag Toppers to identify the cars I have prepared for the Great Race. This one is on a 1936 Ford police car.

A tag topper will usually mount to the front of modern cars and trucks, either as uppers or downers.

All of the ink used on Fifth Avenue Tag Toppers is UV resistant and fade resistant and is the same ink they use on interstate road signs.

That means you can power wash your tag topper at the car wash to get the bugs off without worrying about the ink coming off with it. All of the Fifth Avenue Tag Toppers have passed the Kansas June Bug Test... where you hit a Kansas June bug a 70 mph and there is no damage your tag topper. Sorry...we can't same the same for the June bug.

And last but not least the Fifth Avenue Tag Toppers are made in the USA by the same company that was established in 1946 to make what else...Tag Toppers identifying volunteer fire department members. That same company today, makes all kinds of graphics for fire trucks, ambulances, and rescue vehicles, police cars and the like.

They have kept up with technology and that is why we are able to offer multi-colored Tag Toppers, although they did not apply that technology to Tag Toppers until I showed up on their doorstep. They mainly use the multi-colored graphics on the firetruck, ambulance, and rescue vehicle graphic projects. I was happy to expand their horizons.

I worked in graphic arts for 20 years before I started Fifth Avenue, so I am able to design and layout all of my own books, catalogs, and advertising. I knew how to design tag toppers but I wanted authentic ones from a company who was established when tag toppers were popular. I also wanted them to be USA made.

I finally found a company and we compared notes and we are on the same page. Now here we are some ten years later and I am still making custom tag toppers. I do it for the fun of it, to keep a part of automotive advertising history alive. Some things you do for the fun of it, not the money. And the Tag Toppers I create today will be collectible in later years just as the originals are today.

A Tag Topper is a period correct automotive advertising accessory that is just as effective today as when they were popular in the the 1940's and 1950's.

So if you are interested in a custom tag topper for your business, a car club, or event drop me an email at fifthavegarage@gmail.com and show me what you have in mind. I will help you figure out and a design that will result in a good looking tag topper than you will be proud of. Below are some of the more popular ones I have done in the past.


READ MORE

Your 6-volt Radio and Converting to 12-Volts...What You Need To Know

Posted on 5/1/18 with No comments

I get this question at least a half dozen times a week..."How come you don't have a reducer for my 6-volt radio? " The short answer is this..."Because of the amount of current your radio needs to work properly varies, due to things like to reception, sound level, and the voltage available (With the engine off less voltage will be delivered to the radio requiring more current from the battery as compared to engine running and generator output.

The voltage  delivered to the radio can range between 5 volts and 7 volts. A voltage reducer has no way to compensate for that variance in incoming voltage. Most voltage reducers have a 40 percent error rate, and to a radio that is a lot.

The Details - 

When the electrical load varies more than 10% that greatly affects the life of the vacuum tubes, and the parts inside of the radio itself. Your original 6-volt tube radio should never receive more than 8-volts... so if you are running an 8-volt battery your original radio will not be long for this world. That also goes for your dash gauges, bulbs, and anything else electrical.

Also keep in mind...that most voltage resistors are only about 50 % efficient. That means that when the voltage is reduced by half (from 12-volts down to 6 volts) the amperage output is also reduced by half.

In reality...that means that in order to get the 12 amps needed to start your radio, your electrical system would need to deliver 24 amps to the incoming side of the voltage reducer.  Now after the radio warm up and it only requires 8 amps of current to function, the incoming electrical load changes to 16 amps of current.

That is a huge variation in the electrical load so what usually happens is the radio voltage reducer is designed for an average between the high and low voltage. Because of the 40 percent error rate and having no way to adjust for the range in voltage is what causes problems for your radio.

The other concern... is what happens with the heat generated as the voltage reducer scrubs off the excess current. Think of this as driving down the highway with the emergency brake on. The faster you drive the more heat that will be generated. A voltage drop for a radio is equal to about 50 mph. Things will get damn hot!

Despite the best advice... I still see voltage reducers advertised for original tube type radios. The people selling the voltage reducers clearly do not know how they work or about the fire hazard they represent!

Even if your radio survives the fluctuations in voltage, your car may not.  The chances of your antique vehicle catching on fire from an overheated voltage reducer is very real. I have seen a half dozen antique vehicles over the years... catch fire and were destroyed from an overheated voltage regulator.

Imagine what would happen inside of your house if the voltage varied forty percent? Any type of voltage reducer that works off of resistance (which is about 90 percent of those sold for original tube type radios) will kill off your radio within the first year they are installed.


This type of voltage reducer has been around sine the 1970's.

And just so you know...it doesn't matter it the voltage reducer is encased in ceramic like the old school ones, or attached to a block of aluminum to serve as a heat sink... the end result will be the same!

This is a modern version of the old school ceramic voltage reducer.

By contrast, if you were to convert your original 6-volt radio to 12 volts, your radio would require just five amps to function. By converting your radio to 12 volts, solid state tubes, and vibrators can also be installed which will eliminate the warm up time. There are 12-volt tubes and vibrators available for most 6-volt radios. The radio would come on and play immediately just like a modern radio does today. In addition, features like FM can be added. The outside of the radio will look and function the same as it always did.

You can also get solid state rectifiers and leave the tube sockets empty (most of the time they will epoxy a washer over the tube sockets so nobody tries to replace the tubes) or they can change the rectifier socket to a mini and use a 12 x 4 rectifier.

They will also change the dial lights and make sure the outside of the case is marked 12 volts. That is a much more reliable and safer solution and one that will last for many years. You have a lot of options that come with your upgrade to 12-volts.

There are dozen of radio shops still around that can convert your original 6-volt radio to 12-volts and keep the original looks and function.

So...that is why I do not offer a voltage reducer for your radio and now that you know how they work, you know to stay away from them as well.


READ MORE

A "DA Plug..." The Solution To A Common Problem

Posted on 4/24/18 with No comments

The often misunderstood Fifth Avenue "DA Plug" has been around since 1987.  It came about out of necessity, and while the job it has to do is simple, it is very important. Let's have a look....

When you install an alternator on an antique vehicle that originally had a generator charging system, good things happen. You will have a charging output at idle and low rpms, something the generator charging system could not provide.

That gives you brighter headlights and easier starting because the battery is now fully charged and remains that way.  The alternator now provides the current to power the headlights instead of the battery as it did with the generator charging system.

Having the alternator provide all of the electrical current makes is possible for the battery to only be used for starting, with the current quickly replaced in the battery from the alternator after starting.  The less times the battery is deeply discharged and then recharged, the longer it will last. That is why the batteries in modern vehicles last so much longer.
The one downside of installing an alternator on an antique vehicle is that your antique vehicle will no longer shut off using the original ignition key. That is because the alternator produces an electrical output at idle (whereas the generator did not) so even though you turn off the ignition key, the output current from the alternator at idle, will travel backwards thru the ignition switch keeping the ignition coil "hot" which allows the engine to keep running!

This same thing happened to the engineers in Detroit when they switched to an alternator type charging system. Their solution was a little more complicated. They developed the "accessory post" type of ignition switch with an extra "accessory" terminal that was isolated from the rest of the terminals on the ignition switch.

The alternator was wired to that post, and that allowed current to flow from the ignition switch to the alternator but not backwards from the alternator thru the ignition switch. So when the new design switch was turned off the current stopped at the accessory post and the ignition coil no longer received battery current. Without battery current...the engine died. Problem solved!

Many of the "experts" will tell you to do as Detroit did and go get, and install an "accessory" type ignition switch and life will be good. That is true, however...in many applications an "accessory type ignition switch will not fit in the same place as the original ignition switch, and in some cases you just don't want to loose the look and fit of the original switch.


Example of a typical aftermarket "accessory" type ignition switch.

That was the situation I was in. I decided their had to be an easier way to fix this problem. After many months of experimenting the DA Plug was born. The DA Plug simply snaps into the top of a standard GM style internal regulated alternator (the standard alternator on all types of 1973 thru 1985 GM vehicles). That style of alternator remains popular even today because of its easy mounting, the fact that it is internally regulated, and its bullet-proof reliability.

I build the DA Plugs using heavy duty ISO 9001 rated electrical diodes to be sure your antique vehicle will shut off using the original ignition switch with no modifications.  A diode is simply a one way electrical valve and only lets current flow in one direction. The DA Plug also "turns on" you alternator so it begins to charge as soon as you vehicle is started.

That is important because the idle speed of your antique vehicle is slower than the 1200 rpms idle speed of cars when the alternators were introduced in the late 1960's. So to make the alternator start charging sooner that it was designed to start charging the DA plug send a little battery current to the alternator when the ignition key is turned on which tells the alternator to "go to work!"

While I was at it I made the DA Plugs compatible with 6-volt, 12-volt, and 24-volt,  electrical systems, because I also convert a few antique military vehicles from generator to alternator that still have the 24-volt electrical systems.

Thirty plus years later... the DA Plugs are still as popular as ever. I still make them here in the Good Old USA, and the price has only changed once in 30 years, from $15.00 to $18.00.

The yellow exciter wire comes plenty long enough to reach from the alternator back to the ignition switch or ignition coil, so there is no wire splicing. The other short red wire connects to the battery stud on the alternator and tells the regulator inside of the ignition what to do. It is as simple as that. Instructions are included in the package.

To get a genuine DA Plug look for the red and yellow wiring like shown in the picture above. I sell DA Plugs on the Fifth Avenue website and thru vendors like Speedway Motors.  Typically they are NOT available at the local auto parts store. I have tried but they do not see the need for a DA Plug. Many counter men "get it" and send customers to me which is fine as long as the problem gets solved.


If you go to the local auto parts store and ask for an alternator wiring harness...this is what you typically get. It will NOT do you much good if you are installing an alternator on an antique vehicle. You will have no way to turn off the engine with the ignition switch...

A Note About 1-Wire Alternators -
A one wire alternator is designed to start charging about 1200 or greater engine rpms. One wire alternators were originally designed for racing applications where there was not much electrical load and the engine ran at higher engine rpms.

A one wire alternator stores up magnetism in the rotor from the last time it operated. When the rotor speed reaches high enough rpms the magnetism is released and the alternator begins to charge. If the rpms drop below the alternator's cut-in speed, the alternator will quit charging until the rpms are increased. If the vehicle sets for a month or longer the alternator can loose the magnetism in the rotor.

That is why a one wire alternator typically does not work well in an antique vehicle application. Most antique vehicles do not have a high enough idle speed to make the alternator start to charge.

The internal voltage regulators in a one-wire alternator are different than a conventional alternator so you CAN NOT just add a DA plug to fix your one-wire alternator charging problem at idle. You will need to change out the one wire internal regulator for a conventional two wire regulator and then use a DA Plug to live happily ever after.

How do you know if you have a one-wire alternator? You will see a black rubber plug where the DA Plug would normally go. That is your clue that you have a one-wire alternator.


Rubber plug identifying a one-wire alternator.

So now you know what a DA Plug is and what it does. It is a simple fix for a common problem and is part of what you need for a reliable charging system.

READ MORE

The Flathead Ford Fix Is In...

Posted on 3/29/18 with No comments
I work on a lot of Flathead Ford powered vehicles, and...much like a vehicle entered in the Great Race... you need to address three primary issues to make your Flathead a reliable driver, one that will take you anywhere you want to go. Those issues include the electrical, the cooling and the fuel. If you get those three things working properly life will be good. Let's take a look at each system separately and I will explain what you need to address and why. So pay attention here...


A 1950 Ford is a good example of a car that can be made into a reliable driver

First is the electrical. You know from reading my other Garage Tech articles that the difference between an alternator and a generator...is the alternator has the ability to recharge the battery at idle and low rpms, something a generator cannot do. That helps with the dead batteries and dim headlights and the hard starting.  You also know by now, the importance of the correct size battery cables (use at least one gauge) for both the positive and negative posts on the battery, AND be sure and move the ground so it connects to a starter mounting bolt or as close to the starter as you can get. Your goal is to create a direct path between the battery and the starter so all of the current needed from the battery gets delivered directly to the starter. In simple terms...it will increase your cranking power 30 percent. That should get your attention. You also want to be sure you have a clean metal to metal connection at the starter ground and include a toothed star washer under the bolt head.


A wide selection of alternator pulleys are available to cover most any application


If you are using an alternator (I manufacture both 6-volt and 12-volt alternators) you want to use a one piece pulley on your alternator. The pressed tin spot welded two piece pulleys common to most generators (and some alternators) will break and separate when belt wears thru spot welds in the groove of the pulley. When the pressed tin pulley separates from the alternator, it usually ends up in the radiator. That two dollar pulley can end up costing you a fortune. I have lifetime guarantee on all my pulleys and you know if the Great Racers have not yet destroyed one it is not from a lack of trying. If my alternator pulleys will hold up to that environment, they will survive most anything.


Special alternator pulley for use with mechanical fan mounted to the alternator pulley


But...you say... "I have a 1936  Ford with the mechanical fan mounted to the generator pulley, bet you don't have a fix for that? Well guess what...I do! I have an aluminum one piece pulley that will accept your mechanical engine fan that will bolt onto either the 89 or 90 series alternators. It is made of solid aluminum so it will not destroy the from bearing in the alternator. Using a heavy steel pulley large enough for the mechanical engine fan would wear out the front bearing in the alternator, which is why they had a double row bearing in the early Ford generators.


Fifth Avenue 6-volt alternator mounted on a 1950 Ford Flathead engine

I also have alternator mounting brackets that will work for the Flathead Ford, Lincoln and Mercury engines. It mounts the alternator up in the same position as the old generator was, and the belt adjust procedure is the same as before.


Alternator mounting bracket allows for the same belt adjustment procedure as before

I also have a host of different alternator pulley combinations to accept either the early Ford "B" width fan belts or the later 3/8" fan belts. I also have dual groove pulleys that have the "B" width in the inside and a 3/8 on the outside so you can power modern accessories like an A/C compressor from the alternator pulley. I also have dual groove 3/8 pulleys and dual groove "B" width pulleys, you get the idea.


Fifth Avenue has a wide pulley selection to cover most any application


Stainless coolant overflow tank is available from Fifth Avenue

Next up is cooling. First off you need some kind of coolant overflow tank. Then a 2 - 3 pound pressure cap is enough to transfer the coolant back and forth. It will also raise the boiling point of the coolant slightly, which is a good thing.

Your goal is to keep the outside air out of the cooling system. When your radiator overflows it pushes coolant out on the ground, when it cools it will draw outside air into the cooling system. then...the next time the engine gets up to operating temperature the outside air mixes with the water in the cooling system and a steam pocket is formed. If that steam pocket expands enough it can slow or even stop the circulation of coolant thru the engine block. You know what happens then, cracked block, usually between the two middle cylinders, a common Flathead Ford experience.

Remember there was not permanent year around anti-freeze when these cars were new, Most anti-freeze in the early days was alcohol based and would evaporate out in the summer months. That is why it was common practice to drain the antifreeze out in the summer months, and replace it with water. Flathead engines will run warmer with a 50/50  mixture of modern antifreeze in the summer months, than they will if straight distilled water is used. Don't forget to add a pint of water pump lubricant in with the water,  (which was water soluble oil (brake fluid ) in the old days.

Electric Radiator Cooling Fan - 
Also...an electric radiator cooling fan is a good investment and I have them for both 6-volt and 12-volt applications. When you shop for one, look for a ball bearing motor, they will use less electricity and last about three times longer.


Also look for ten blades that are straight like helicopter blades (remember you are in the air moving business) which is why you are going to add an electric fan in the first place.  I know they sell curved blades which are quieter but they are also less efficient.  Just remember the helicopter analogy.... Helicopters depend more on air moving than you do... so if a curved blade was more efficient ...than helicopter blades would be curved. They aren't... and yours shouldn't be either. Also watch the pitch of the blades, the more aggressive the pitch the more air the fan will move...but the bigger motor it will require. Your goal is to help the radiator transfer the heat out of the coolant. That happens when air passes thru the radiator. Anything you can do to help that along will be to your benefit.


You want a ball bearing motor for a long service life!


Here is an example of an electric radiator cooling fan installed on a 1950 Ford. The electrical system is still 6-volt. The fan reduced the operating temperature of this car 25-30 degrees which meant the owner could now drive in the annual local parade and enjoy cruise night without social embarrassment. It is more fun to be a participant in cruise night than it is to have to sit along the sidelines after two laps because your car overheated... in front of everyone.


And then their is this if your Flathead is non stock or you are entered in the Great Race or you want a cooling system you never have to worry about.  This is what I use in the cooling system of Great Race cars and especially in antique vehicles built in the teens and twenties that have a non-pressurized cooling system and no water pump to circulate the coolant, that instead depend on thermal-siphon cooling. The Model T Ford is a good example. This coolant also works great in a Flathead Block.


Evans Waterless coolant boils at 370 degrees and freezes at minus 80 degrees

Evans Coolant boils at 370 degrees and freezes at minus 80 with no pressure in the cooling system. It is a waterless lifetime coolant. It is expensive initially...but it pays for itself many times over in the long run. You never have to worry about overheating again!


Fifth Avenue Gear Driven Electric Fuel Pump

Lastly is fuel. An electric fuel pump is almost a must these days and you need a Fifth Avenue gear driven electric fuel pump that will survive the modern gasoline. (to read more about electric fuel pumps (see electric fuel pumps in the garage tech section). You also need to add a pint of diesel fuel to ten gallons of gasoline, when you fill up.

That will do two things....it will raise the boiling point of the gasoline so it does not vaporize so quick, and it will lubricate the gaskets in the carburetor so they will not shrink. The alcohol in modern fuel causes the gaskets in the carburetor to shrink leaving you with a leaking carburetor. If you try and over tighten the screws in the top of the carburetor to stop the leaks, one of two things will happen, you will warp the top of the carburetor or...strip out the screws or damage the carburetor housing itself...none of which is good.

The alcohol in modern gasoline also swells up the diaphragms (causing them to tear) in the old Stewart Warner electric fuel pumps that we all used for years. The modern gasoline also destroys the modern rotary vein style electric pumps (the modern gasoline provides no lubrication so the veins just grind themselves up much like you sawed graham crackers in kindergarten.


The inner workings of a Fifth Avenue electric fuel pump

The Fifth Avenue pumps have two stainless steel gears inside and are unaffected by the modern alcohol gasoline and modern fuel additives. They are available for both 6-volt and 12-volt applications. So if you address these three basics... you will be on you way to having a reliable car that will take you anywhere you want to go.

All the parts mentioned in this Garage Tech article are available in the "PARTS" section of the Fifth Avenue website. Now you know how they work.
READ MORE

I Remember Those...

Posted on 3/21/18 with No comments
The 1940's and 1950"s were clearly the golden age of owning an automobile. This was before computers and cell phones so most all of the advertising was visual and "hands on." In order to stand out from the crowd the manufacturer had to use bright colors and graphics to catch the eye of the consumer.


Radios in the early automobiles did not always have the best reception especially in the rural areas, where radio stations were few and far between. This device was supposed to help solve your poor radio reception problem...if the wind did not wiggle it loose and it blew off going down the highway which happened more than once.

This was also the era when cars did not have a ton of accessory options from the factory, so that left the field wide open and literally hundreds of small companies survived and prospered making all kinds of unique automotive related accessories. Ideas for car accessories were limited only by imagination and the public who decided which products became popular for their function or their "cool" factor.


This is a "Passing Mirror" which attached to the drip rail of the driver's door and allowed you to see around the car in front of you to determine when it was safe to pass without having to weave over the center line.

When I started buying out dealerships and auto parts stores in the  early 1970's I only wanted the parts related to the 1948 thru 1955 Chevrolet cars and trucks. There were lots of car accessories available from those same vehicles that were by then obsolete. I would find whole displays of obsolete accessories in the basements of old dealerships and auto parts stores. The displays and the NOS accessory parts were twenty plus years old by then and had no value to the store or the public.


Many people smoked in the old days so there were dozens of accessories for smoking in your car or truck. This is one of the more unique smoking accessories. It held a pack of Lucky Strike or Camels (remember no filters) and when you flipped down the little tray in front... a single cigarette rolled out and the element on the left lit the cigarette for you... so it was ready to smoke. It was advertised as a safer way to smoke in your car or truck. This smoking accessory attached to the steering column of the car or truck and plugged into the cigarette lighter.


I got hooked on those aftermarket accessories and started buying them up. You can imagine what my collection looks like today after 25 plus years of collecting.

I first used old JC Whitney catalogs to help identify some of the more unique accessories,  then I started to collect the old auto accessory and wholesale auto supply catalogs to further help identify the pieces in my collection. Now I have a good sized collection of the old accessory catalogs. Many of the accessories were also sold as private label accessories thru such stores as Firestone, Gambles, and Western Auto.


Now some 25 years later I have a unique collection of automotive accessories from the golden age of automobile. I will share a few pictures with you here. These serve as a reminder of how simple and carefree things were in the old days. As more and more accessories became standard on new cars the sales of aftermarket accessories gradually declined and many companies went out of business or began manufacturing something completely different.


Some things they sold back in the day were a little questionable such as this Ring and Valve job while you drive which was pretty expensive, even for the late 1950's. Inside the package was a series of lead pellets that you were supposed to drop into your gas tank and somehow they would dissolve and fill the tiny holes in the cylinder walls and the valve seats to restore compression and engine horsepower. I have quite a few examples of these types of products in my collection, this is one of the more questionable ones.


Auto parts stores had some unique collectibles from the manufacturers. This was a desk lamp from Fram Filters given to the store owner for his desk. With the lamp shade on... these lamps did not put out much light so most of them you find are missing the lamp shade, it got tossed in the trash.


This was a Fram Filter ash tray that was designed to set on the parts counter( remember a lot of people smoked in those days). These had a pretty rough life as they got knocked on the floor quite often and then were picked up with greasy hands. That little flip tab in the middle was the first to go by a well meaning customer who just happen to have a pair of pliers in his pocket. It made flipping the ashes into the can easier.


In case you are too young to remember here is what the typical Fram oil filter looked like back in the day. You can easily see the resemblance between the actual filters and the Fram advertising pieces.


Hard to imagine today but prior to the mid 1950's automotive engines did not come with oil filters from the manufacturers. They quickly became a popular add on accessory for obvious reasons. Here is one for a 216 Chevrolet engine that bolted to the intake manifold. The oil filter shown above on the right was used in this filter.


This was by far the most popular Fram Counter advertising example. All that you had to do was pick up this Fram advertising display and tip it 45 degrees and the lighter in the center would glow cherry red. It was big enough to light both cigars and cigarettes. You often find these with all of the writing worn off the sides but the lighter still working. I talked to a retired Fram rep who said these lighters were the most difficult to keep in stock. These were also known to burn little fingers if the mechanics helper wasn't watched closely.


It is amazing all of the things that we grew up with and never paid much attention too. Today's plastic advertising is not near as visual and not made to last. When you find something from the old days... (and if you are like me) it jogs a memory of our youth and the auto parts stores and car dealerships we grew up with. While those places are long gone... a piece of advertising like those shown here can be a welcome reminder of how things used to be. Now...if we could only explain that to our grandkids!

READ MORE

It Happens To Me Too...

Posted on 2/28/18 with No comments
I spend a lot of time preparing cars for the Great Race. And what I learn from those "hands-on" experiences can be applied to most any antique vehicle. So when you call and talk to me on the telephone and ask an electrical, cooling, or fuel related question, and then wonder how I can give you an answer immediately without hesitation, it is because I have fixed problems just like yours, dozens of times before. So the next question that eventually comes up is "how come nothing bad ever happens to your antique vehicles...?" Well guess what...it does happen to me too!


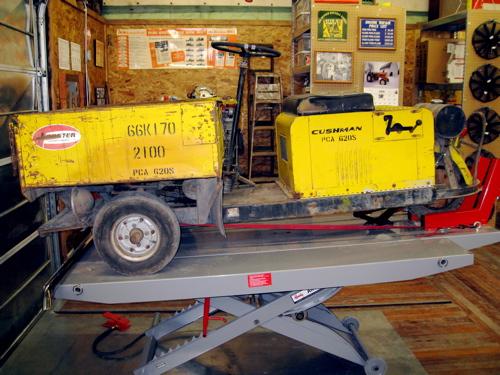
Here is my latest victim to the modern gasoline. By the way... this is how your orders get delivered to the post office most days. I am located a quarter mile from the local post office so I deliver orders to the post office using this 1966 Cushman Lobster.

Lobsters were built by the Cushman Company of Lincoln Nebraska, the same company that built all of the scooters that are so well known and fondly remembered, especially if you were lucky enough to have one to use on your paper route.

Cushman built Lobsters only one year in 1966, and only built about 500 total. They quickly became the Edsel of the Cushman Company. They steer from the front using a boat cable steering setup compliments of OMC (the boat company) who was part owner of the Cushman Company at the time.

Lobsters used the variable speed transmission from the Cushman Golf carts, mated to a two speed gearbox...one forward gear and one reverse gear. That means the Lobster travels 18 mph in reverse... the same speed as it does forward. What could possibly go wrong with that setup...?

The Cushman foundry had pretty much disappeared by this time so the Lobsters were built using 8 HP Kohler engines, the same engines that were used in the Wheel Horse garden tractors of the era.


This is a picture of the Lobster when I bought it. This is the good side. The RH front corner had been damaged and the whole right side had been creased like it had been scraped next to a wall or building. The engine was tired, brakes were coaster brakes, bald tires, you get the idea.  

(Former employees told me they used to haul 600 pound dies back and forth from the plant to the tool and die shop using this Lobster, which explains a lot.) Payload rating was 500 pounds including operator.

Meanwhile... back to our lesson. The lobster ran when I got it in 2009, but barely. It had been sold new to Boeing Aircraft in Wichita Ks, which explained the yellow color, as Lobsters were typically painted safety orange new from the factory.

With the Lobsters being difficult to sell, Cushman would paint them any color you wanted if you would buy one, and especially if you would buy more than one! Anything at the Boeing factory that traveled next to the flight line... that didn't fly, was supposed to be painted yellow, so yellow they were.

Boeing reportedly bought a dozen or more Lobsters, at a bargain basement price, and most were damaged beyond repair over time and hard use, and were scraped. They all had a very hard life much like this one did.

After I learned to drive the Lobster, I understood the damage to the box. Driving a Lobster can best be described as like driving a sheet of plywood. It has a wide (20 feet diameter) turning radius and not much accuracy with the boat cable steering... and no suspension except the air in the tires.


When I restored the Lobster in 2013, I overhauled the engine, fixed the brakes, removed all of the dents, repainted the body in Boeing safety yellow, cleaned out the fuel tank and replaced all of the fuel lines with OEM Kohler factory fuel line hose, and modern filters. It looked and ran like a new one, until the end of 2017 when it became hard to start and seemed to not have as much power as it used to.

I replaced both fuel filters and cleaned out the carburetor (which looked pretty clean inside) and all seemed good for another month. Then back to the same old symptoms. By now it was January and to cold to ride to the post office so it was time for an upgrade.

I put it onto the lift in the shop and pulled the fuel line off and looked inside. Sure enough it was starting to fail from the inside. I could see little black specks inside the fuel line that looked like coarse ground pepper. So I did what I tell all of you to do... and I replaced all of the fuel line with the modern Barrier fuel line.


After some research on the internet, I learned that the older Wheel Horse tractors from the 1960's were having the same fuel delivery issues I was having, (these Kohler engines came with a mechanical fuel pump) so they had some special low output (as in 1.5 psi output) 12-volt electric fuel pumps made for their tractors. Being the same engine I figured their electric pump would work for the Lobster... and it did.

As you know I am a believer in fuel filters... and this application is no exception, so there is now one clear see-thru filter between the fuel tank and the electric pump, and another metal housing 30-micron fuel filter after the electric fuel pump and before the carburetor.

This combination fixed the fuel issues and the Lobster starts and  runs better than new. So I just wanted you to know, that what happens to you, also happens to me.


READ MORE

Before the Shelby Cobra There Was the Allard Car Company.

Posted on 1/4/18 with No comments

If you have read thru the testimonials page on the website you will begin to get an insight into the vast array of vehicles that Fifth Avenue customers own and drive. One that recently appeared was David Stein's "Allard" motor car. I have received quite a few emails asking "what the heck is an Allard...? " So...here is a little insight into the Allard Car Company.

Sydney Allard started the Allard Motor Company Ltd in the UK, a few months after the end of WWII. He was a gentleman racer with strong engineering instincts and he created vehicles that would take a slew of 1st, 2nd and 3rd positions in major races, including podiums at the 24 Hours of Le Mans and a win (with Sydney himself behind the wheel) at the Monte Carlo Rally in 1952 (interestingly the 2nd place finisher that year was a young Stirling Moss).

The Allard K3 that Dave owns,  was the follow-on model to the original K1 and K2. It is essentially a British chassis and body that was sent to the USA where it was fitted with the owner’s engine preference. Most were fitted with Cadillac 331 engines. A very limited number were fitted with a higher performance Chrysler Hemi V8.

The lightweight alloy body coupled with a semi-independent swing axle on the front and de Dion-type rear axle suspension gave the car exceptional handling, the Hemi V8 with dual 4-barrel carburetors and mated to a 4-speed manual transmission gave the Allard K3 overall performance that could comfortably match anything of the era.


1953 Cadillac 331 Engine Powers The Allard

The K3 was built between 1952 and 1956; each was painstakingly made by hand which resulted in some variance between models from different years. Allard’s facilities were never quite on par with other British car makers, resulting in a low production volume of only 62 units.

Carroll Shelby of Cobra fame owned and raced an Allard for a short time in his early years and was impressed by the strong performance and good handling of the Allard. The Allard must have indeed made an impression on Carroll which eventually lead to his introduction of the Cobra in the 1960's.

While the Allard was clearly first with the concept of big American engine in a sports car type body, due to the limited production it never became as famous nor as popular as the Cobra would become in later years.

While not so common today the GM Hydramatic transmission came standard behind 331 Cadillac engines during the 1950's. The Hydramatic was the first automatic shifting transmission developed by GM in the 1930's and became a popular option for all GM makes beginning in 1940. That explains why it was a logical choice for the Allard during the 1950's.

The GM Hydramatic was also the first automatic transmission to be modified for drag racing. The Hydramatic proved to be so reliable that by the early 1950s, 25 other companies including Hudson, Nash, Willys, Lincoln and even English luxury brands like Bentley and Rolls Royce were buying the Hydramatic transmissons from GM to use in their own models. They were also used commmercially in Divco delivery trucks.


The GM Hydramatic Transmission in the Allard Chassis

The Hydramatic eventually made its way into military tanks, including the M5 Stuart and M24 Chaffee tanks. The Stuart was powered by a pair of Cadillac V8s, each of which had a Hydramatic bolted to it. Another interesting factoid is that the Hydramatic transmissions were four speed transmissions. They did not have an overdrive, as fourth gear was 1:1. Hydramatics also did not use a torque converter that multiplied engine torque, instead a basic fluid coupling was used.

Dave's car remained in California through its first three owners and has spent the last five years in Indiana as part of a private collection until David recently purchased it.

Because Allard's are somewhat unknown I wanted to feature David's car not only because of it's rarity and the fact that it is in excellent condition...I also wanted to show you the unique feature David's car has...overdrive!


 The R-11 Overdrive Transmission and Solenoid.

Dave car was fitted with an R-11 overdrive onto the back of the Hydramatic transmission.  That of course took some special machine work on the output shaft of the Hydramatic transmission to adapt the R-11 overdrive.

Dave contacted Fifth Avenue after he recently purchased the car to learn how an R-11 overdrive worked in a normal application and to see if I could help him figure out how it was designed to operate in his Allard.


There Is A Short Black Lever Just To The Inside Of The Chrome Lever That Manually Engages The Overdrive

None of the conventional overdrive controls are present. There is no dash cable present, the overdrive is engaged via a short lever on the floor to the left of the driver's seat. Together Dave and I will figure out how his works.

Meanwhile I thought you might enjoy learning a little bit about the Allard car company and see yet another example of a Borg Warner overdrive installed in a unique application.


READ MORE

Latest

About Me

My photo
Since 1987, Fifth Avenue owner, Randy Rundle, has been making antique, classic and special interest vehicles more reliable and fun to drive.